This sunday was Mother's Day in France. We're not in France, and my kids are small to recall of the fact (6 and 2 y.o) AND my husband deployed (not in France, because otherwise he'd take note. As long as he's absent I'm not watching television, and stay much less online, otherwise I would take note). Long story short - we all happily forgot it. Until yesterday a friend of mine asked me. Her daughter came for a sleep over at our place, and this project fall quickly in place - the little girl and my little girl made both those mosaic hearts as fridge magnets. I am only sharing it almost as the Mother's Day has gone over - sadly. But you can make those magnets without any special Mother's Day notion, right? Let's move!
I've spent half an hour drawing, drilling and sanding. And we spent all together half an hour choosing mosaics and putting them together - fun part. Mosaics was very free style, because it was late evening and last thing I wanted was to art direct anything. I was simply happy sitting nearby and listening to their thoughts on subject: like, "Look, I'd like to make eyes here, and a nose". "On a heart?" "Well, yes, see, it's coming out nicely, isn't it?".
Next morning I've put plaster and varnish - another quick-n-easy step, better without kids, because you have to be quick, precise, and careful. Please meet the happy magnets with candy colors!
And happy Mother's Day for those celebrating it to french calendar!
Showing posts with label Stationery. Show all posts
Sunday, May 31, 2015
Tuesday, May 5, 2015
A wooden elephant stand for a card
Let's get back to making more detailed DIY posts, right? Though my internet connection is still poor, and there's no amelioration in sight (yes, believe me, though I can hardly believe myself as I'm writing those lines), and the DIY's are longer, picture heavy, and hence demand more upload time, let's take a risk!
That elephant from the previous post - he needed a card, and he got one. Here's the break down.
That's not an ordinary card, all together that's looking more like nursery deco. It's a wooden elephant, made of three parts - equal in outline, and one of three (the middle one) is cut so that there's a slot when I assembled them. In this slot we put a card.
Actually why not make a simple double folded one, with an elephant on a cover and call it a day? Too simple, right? Yep - actually this card had to give place to eight or ten inscriptions, and in a double folded one that would look messy, and nobody would probably bother writing more. Keep reading - that's fun, and great, when people take time and write more - jokes, thoughts, comments, tipps, own souvenirs, anything that's longer than two lines. Hence this card would (and I'd outline and insist while giving it for inscriptions) to take time and write. Something special. Everybody can write something special if he/she takes time, I believe.
I wanted to make a folded card - sort of dividing it all in pages, yet being all on a one piece of paper. There're fabric inlets to divide, create some visual interest, and match the stuffed toy I've made previously.
Well, back to the elephant - it's a sturdy one, my plywood was 9 mm thick, threefold it brings to 2,7 cm, slightly over 1", so it stands pretty well. This elephant wasn't initially planned. It came as an answer to the question - how to make a folded card look nicely and not fall apart without any ribbons of other closing/holding together fussiness. The elephant was the answer, made as a stand, to slip the card into and hold it perfectly.
That's all, try it out, it doesn't take long if you have some basic sawing experience, pay attention to exactly where you cut, and have some patience for sanding. Mines weren't exactly perfectly equal, so yes, I've spent one evening watching a movie and sanding - but that doesn't sound that bad, right?
That elephant from the previous post - he needed a card, and he got one. Here's the break down.
That's not an ordinary card, all together that's looking more like nursery deco. It's a wooden elephant, made of three parts - equal in outline, and one of three (the middle one) is cut so that there's a slot when I assembled them. In this slot we put a card.
Actually why not make a simple double folded one, with an elephant on a cover and call it a day? Too simple, right? Yep - actually this card had to give place to eight or ten inscriptions, and in a double folded one that would look messy, and nobody would probably bother writing more. Keep reading - that's fun, and great, when people take time and write more - jokes, thoughts, comments, tipps, own souvenirs, anything that's longer than two lines. Hence this card would (and I'd outline and insist while giving it for inscriptions) to take time and write. Something special. Everybody can write something special if he/she takes time, I believe.
I wanted to make a folded card - sort of dividing it all in pages, yet being all on a one piece of paper. There're fabric inlets to divide, create some visual interest, and match the stuffed toy I've made previously.
Well, back to the elephant - it's a sturdy one, my plywood was 9 mm thick, threefold it brings to 2,7 cm, slightly over 1", so it stands pretty well. This elephant wasn't initially planned. It came as an answer to the question - how to make a folded card look nicely and not fall apart without any ribbons of other closing/holding together fussiness. The elephant was the answer, made as a stand, to slip the card into and hold it perfectly.
That's all, try it out, it doesn't take long if you have some basic sawing experience, pay attention to exactly where you cut, and have some patience for sanding. Mines weren't exactly perfectly equal, so yes, I've spent one evening watching a movie and sanding - but that doesn't sound that bad, right?
Friday, April 10, 2015
Album with children's drawings
There's another album, another gift - a teacher's assistant is leaving and we made with kids an album to say THANK YOU.
Recently I've got a punching-&-binding tool, which is rather simplistic, but I wanted to get started to make more profesionally looking albums, and was not ready to invest a lot into a more high-end device. Some details bummed me about pricier models, so I keep waiting. Anyway I got one, a reasonably priced starter model, that promised to punch thick cardboard (mine was about 2,0 strong), and it's working not bad.
This album went all crazy about colors, which happened accidentially. It was planned with many softy pinks and oranges, and some greens, and yes, vivid yellow hues for daffodils, but I got some drawings on colored paper, like hot pink or neon yellow, so I had to add more energy to the whole thing and shake it up. And as kids drawings are spontaneous, the album had to get more playful and less orchestrated as well. That's how it turned out more graffit-y, and merged, and experimental with unexpected elements. But you know what? That's normally where all the fun begins.
Anyway, the binding device did a great job - see the cover? I wish I had left the pages two days longer under heavy pressure, because I was not able to get good pics - the edges were slightly wound up (not a big deal, but tricky for photograph) - lesson to learn for the next time!
Recently I've got a punching-&-binding tool, which is rather simplistic, but I wanted to get started to make more profesionally looking albums, and was not ready to invest a lot into a more high-end device. Some details bummed me about pricier models, so I keep waiting. Anyway I got one, a reasonably priced starter model, that promised to punch thick cardboard (mine was about 2,0 strong), and it's working not bad.
This album went all crazy about colors, which happened accidentially. It was planned with many softy pinks and oranges, and some greens, and yes, vivid yellow hues for daffodils, but I got some drawings on colored paper, like hot pink or neon yellow, so I had to add more energy to the whole thing and shake it up. And as kids drawings are spontaneous, the album had to get more playful and less orchestrated as well. That's how it turned out more graffit-y, and merged, and experimental with unexpected elements. But you know what? That's normally where all the fun begins.
Anyway, the binding device did a great job - see the cover? I wish I had left the pages two days longer under heavy pressure, because I was not able to get good pics - the edges were slightly wound up (not a big deal, but tricky for photograph) - lesson to learn for the next time!
Tuesday, March 31, 2015
Recipe organizer
A couple of months ago I've made this
recipe organizer. Once a week at school the kids come together to
cook – the same as I'm volunteering to make my weekly crafting
workshop, the same two other moms make a cooking workshop. And my
little girl and some other little friends of hers attend this class. The
result are tasty treats she brings home friday afternoon, but also
LOTS of recipe pages we've accumulated over last months.
This organizer wasn't for my girl
though – there's a boy in a cooking class and his mom's making it
happen and puts lot of love and time, and work into it, so my guess was that
they may be in the same situation – LOTS of recipe pages,
beautifully prepared and hand colored by kids during pauses inbetween
cooking steps. That's how I came up with the idea of organizer.
I've taken a simple cheap organizer
from a discounter, a handful of paper napkins with „boyish“
motifs (I simply chosen something that wouldn't be flowers, or any
pink and pastel hues in my soon- to-be-huge collections of finnish
paper napkins). I had here Marimekko (fish motif), Finlayson (bears and fruit trees), and some other less
fancy home decoration brands on hand.
After it was almost finished I realized
I needed separator sheets to break down the mass of transparent page protectors I've put into the organizer, but also to easily find recipes in categories: main meal – meat and fish, side
dishes, desserts, and miscellaneous. I've cut the blanc paper to have side
flaps on the right side to write/stamp the tags: viande, poisson, legumes, etc. (in french). The napkins I've used for the organizer itself were great here,
because I could underline the content with fish, bear, fruit pictures, and
some bubble foil print in olive green imitating green peas
(vegetables).
Colors are not usual, very much not
usual. So I've made a digital collage and a tablette sketch first to see which
other colors would work well. I think it's a pretty helpful step and
though it's for me like a step-aside, which I'm not always willing to
make, and maybe I'm not going to make it each time, it's not that
bad. At least for working on projects with some „out-of-my-comfort-zone“ elements involved. They seem less intimidating
with this visualisation.
Now we need one more for my little girl. A more "girlish" one. Stay tuned!
Thursday, October 16, 2014
New ALBUM
This is a new album entitled in french " 27 PROJETS pas comme les autres" (27 projects other than usual). I have a friend, who just turned 27 years, and shortly after actually my own anniversary back in September I've been thinking about making a list of N projects corresponding to that age of N years (thirty-five in my case), and listing those projects to be accomplished in a new coming year. Or maybe documenting the N projects we've been making/living/dreaming of/reading/messing up or working on during the past year.
I didn't have time to tackle it for myself, but the idea got stuck in my head. So that's how it got into life - now my friend is hopefully going to document the twenty-seven fun projects/ideas/whatsoever about her life and her family's life in this brand new album.
It's getting better, the album making process. It's less painful because I'm making less mistakes, and I've learned by doing them lots of useful tricks and techniques how to make it look more what I expect it to look like. Weird colors, lots of violets and that splash of vivid orange - no comments, it just happened.
And yes, the pages are matched to the cover, with same patterns, colors, sometimes a bit softer, so that they don't pop up too much, because they only need to be inviting and inspiring but not outrival the coming content.
As usual those past weeks, I don't have a tutorial for now. I will come next time with a bit more explanatory post sharing some detailed thoughts about the making-of and showing new upcoming albums. Stay tuned!
I didn't have time to tackle it for myself, but the idea got stuck in my head. So that's how it got into life - now my friend is hopefully going to document the twenty-seven fun projects/ideas/whatsoever about her life and her family's life in this brand new album.
It's getting better, the album making process. It's less painful because I'm making less mistakes, and I've learned by doing them lots of useful tricks and techniques how to make it look more what I expect it to look like. Weird colors, lots of violets and that splash of vivid orange - no comments, it just happened.
And yes, the pages are matched to the cover, with same patterns, colors, sometimes a bit softer, so that they don't pop up too much, because they only need to be inviting and inspiring but not outrival the coming content.
As usual those past weeks, I don't have a tutorial for now. I will come next time with a bit more explanatory post sharing some detailed thoughts about the making-of and showing new upcoming albums. Stay tuned!
Monday, October 6, 2014
Gift boxes - from old books, wood scraps, linen and paper
Another project from summer, a pretty new and challenging one.
There have been two old books, an old piece of wood (cheap plywood from a charity shop), a scrap of natural linen and paper scraps. They turned into those two boxes, which I've made for a friend, another friend leaving Finland. I wasn't in charge of filling, the big box contained pictures, quotes, keepsakes, and I didn't attend the farewell party, so I didn't come to see the end result. Other small box was filled with tea bags with handwritten quotes on them.
I have to get to make a couple more so that I can systematize the process and get to describe it better. For the time being it's just sharing with you some pics from behind-the-scene. It was fun and challenging, and actually I'm not quite sure I keep going this way, because all the fine adjustment which box making implies is probably not my cup of tea. Not that much, though designing the cover was the most appealing part for me AND that project was very different from all the sewing and paper stationery making from previous months, so YES, I loved it.
The "hardware" (book cover, wood) for the project have been thrifted. That's also the first time I've drawn the Moomins other than just for my little girl's colorings. First I've been thinking of using some existing book drawings, but I haven't found any of them that would match the idea. So I've made them myself, with ink on nice heavy paper, cut and watercolored them partially. They are bringing pretty much light onto the surface and are simply fun to look at.
That's it, I guess now I'm shifting towards one, at most two posts per week which I don't think is enough. I've debated about coming more often but that would mean I'd have to fill the gaps with some more randomness and watering down the purpose. I've been thinking about outsourcing more random "around-here"'s on Instagram or Twitter (nope, I'm not an Instagrammer yet, and my Twitter account is pretty silent), and just keep this blog more project-centered with "behind-the-scene" focused on work, less on life randomness.
This blog had lot of random content in previous years, some photographs, lot of random stuff around, but I don't like to look back at them right at the moment. I prefer this blog offers a nice and neat track of DIY projects, tutorials and peeks into behind-the scenes. On the other hand sometimes it feels good to share something more out-of-box. I just have to find the proper way to do it.
That means right now it is going to be less updated, but I hope to catch up soon.
There have been two old books, an old piece of wood (cheap plywood from a charity shop), a scrap of natural linen and paper scraps. They turned into those two boxes, which I've made for a friend, another friend leaving Finland. I wasn't in charge of filling, the big box contained pictures, quotes, keepsakes, and I didn't attend the farewell party, so I didn't come to see the end result. Other small box was filled with tea bags with handwritten quotes on them.
I have to get to make a couple more so that I can systematize the process and get to describe it better. For the time being it's just sharing with you some pics from behind-the-scene. It was fun and challenging, and actually I'm not quite sure I keep going this way, because all the fine adjustment which box making implies is probably not my cup of tea. Not that much, though designing the cover was the most appealing part for me AND that project was very different from all the sewing and paper stationery making from previous months, so YES, I loved it.
The "hardware" (book cover, wood) for the project have been thrifted. That's also the first time I've drawn the Moomins other than just for my little girl's colorings. First I've been thinking of using some existing book drawings, but I haven't found any of them that would match the idea. So I've made them myself, with ink on nice heavy paper, cut and watercolored them partially. They are bringing pretty much light onto the surface and are simply fun to look at.
That's it, I guess now I'm shifting towards one, at most two posts per week which I don't think is enough. I've debated about coming more often but that would mean I'd have to fill the gaps with some more randomness and watering down the purpose. I've been thinking about outsourcing more random "around-here"'s on Instagram or Twitter (nope, I'm not an Instagrammer yet, and my Twitter account is pretty silent), and just keep this blog more project-centered with "behind-the-scene" focused on work, less on life randomness.
This blog had lot of random content in previous years, some photographs, lot of random stuff around, but I don't like to look back at them right at the moment. I prefer this blog offers a nice and neat track of DIY projects, tutorials and peeks into behind-the scenes. On the other hand sometimes it feels good to share something more out-of-box. I just have to find the proper way to do it.
That means right now it is going to be less updated, but I hope to catch up soon.
Tuesday, September 23, 2014
Some new colours on the palette
Hey there, new colours friends, but that's been just a fun project I'm trying out because I have a friend who loves violet. And orange. Not an easy colour, the violet, at least not for me! If you follow me since awhile, there're all sorts of teals, pink and orange hues, some olive greens and colours of natural unbleached linen, that's pretty all I have in my program, or on my palette. And I love them.
When I have to paint landscapes, there're actually all of those listed above. With some more colder blues, like ultramarine and cobalt, but rarely purples nor violets. I do love them for shadows though, the deep aubergine hue, it's pretty awesome, or some greyish cold violets for skies or sees, or any other light reflexions.
That's the challenge, my friends, that's quite a challenge for me to build something around violets I would personally love which wouldn't feel like "I have to", but being more of "Not bad, I could love it".
I still hesitate about this one. More lilac than violet, and slightly less orange, like more warm yellow and some warm red hue which would give a nice orange if I'd mixed them. Which I didn't do, and that's okay. I love the funky graffity-like vibe it has, with all the splashes of colour around, dynamic and young.
Now I have to fill the pages and come back to you sharing the whole project. I just popped up, still in doubt but actually surprised, how it turned out. Not bad, I could love it!
When I have to paint landscapes, there're actually all of those listed above. With some more colder blues, like ultramarine and cobalt, but rarely purples nor violets. I do love them for shadows though, the deep aubergine hue, it's pretty awesome, or some greyish cold violets for skies or sees, or any other light reflexions.
That's the challenge, my friends, that's quite a challenge for me to build something around violets I would personally love which wouldn't feel like "I have to", but being more of "Not bad, I could love it".
I still hesitate about this one. More lilac than violet, and slightly less orange, like more warm yellow and some warm red hue which would give a nice orange if I'd mixed them. Which I didn't do, and that's okay. I love the funky graffity-like vibe it has, with all the splashes of colour around, dynamic and young.
Now I have to fill the pages and come back to you sharing the whole project. I just popped up, still in doubt but actually surprised, how it turned out. Not bad, I could love it!
Monday, September 8, 2014
Quick weekend project - a traveller notebook
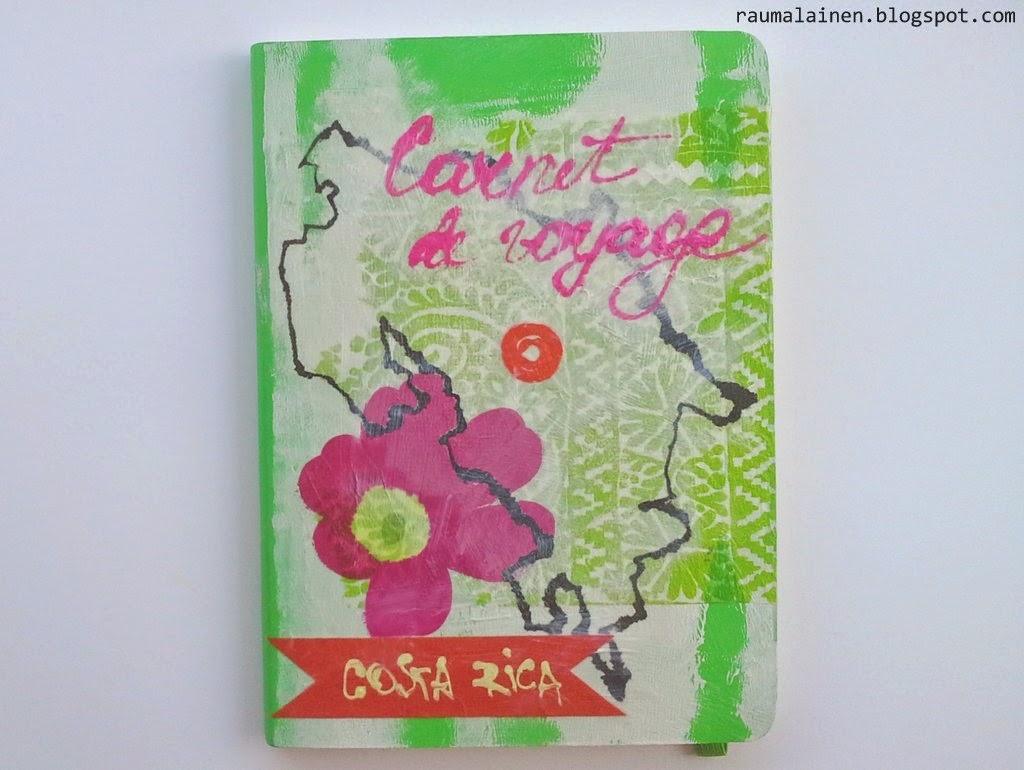
Hi there! Just a sneak peek of a project shortly done at a last minute past weekend. It is going to be another busy renovation week at our place, but I hope I can pop up another time soon. There're some more fun upcoming stationery projects I wanted to talk about here. And probably this one deserves a tutorial as well. We'll see by the end of the week.
No we're not going to Costa Rica, but our friends do.
That kind of projects is always welcome - a notebook in a nice colour and freedom to make whatever I want, subjet to the only condition that the destination had to be mentioned.
Tuesday, September 2, 2014
DIY-tutorial: MAGNETS
Hello my friends, and hello blog, I haven't forgotten any of you! Yes, it's been quite a long time here with nothing new. And you know what? I've spent a very busy summer indeed. And no I'm not kidding. I was just not busy with the blog. Not at all, and yes, I'm sorry for the break. But it was very much needed.
There's been lot of thrifting, furniture moving, repair, repaint and more moving. It's our third year so far in Finland, in this rented place. During our first year I didn't bother about poor rented furniture which came along with the house to actually spare us the furniture shopping. During our second year I got pregnant, the baby boy was born (a toddler already by the way), I was too tired to make any shifts.
So now by the beginning of the summer I started changing things. Moving the rentals out and filling the gaps with what we need, what we like and what feels like our place.
I mean, yes, why bother, you would probably ask. And sometimes I ask myself as well, pretty the same question. I will certainly not make over everything. But with a good dozen of nice pieces here and there, some more work to move around, repaint, and customize the existent and neutral ones, with thrifted accesories and nice modern fabrics it's surely doable. I'm not that far yet, but the way feels right. It's a crazy amount of work, taking into account that I made it during the summer, when both kids were at home all day long.
So far so good. Now it's time to make over the blog. It's insanely outdated, all the features are so bothering me. I wish I could not write those lines and first make some steps, so that you see the results. But I guess it has to be more of a complete make over, and now I'm up to learn how to do it. I don't know yet if I'll keep the name (nice, but long, and that bums me out), this format is not going to last, I'm literally sick of it, and probably that's the reason I was not that much present here either.
Now let's get back to crafty life, my friends. It actually hasn't stopped, but it's time to give you another inspirational project! Thrifted have been: an old frame, and ply wood - to make a fun magnet board and cute magnets.
This tutorial is about the magnets, not the board. Just a few words about the latter: it was old, big and heavy, and sad - something golden and grey and crimson - with a poor oil painting inside. I have sanded and repainted it in red. I also made an inlet of a piece of fiberboard that I cut to size, and coated it with magnetic paint. That's all! And I have to say I'm THAT jealous and happy about a good friend who got this gift.
Happy birthday, Céline!
Tuesday, July 15, 2014
A new album and about happy incidents along the way
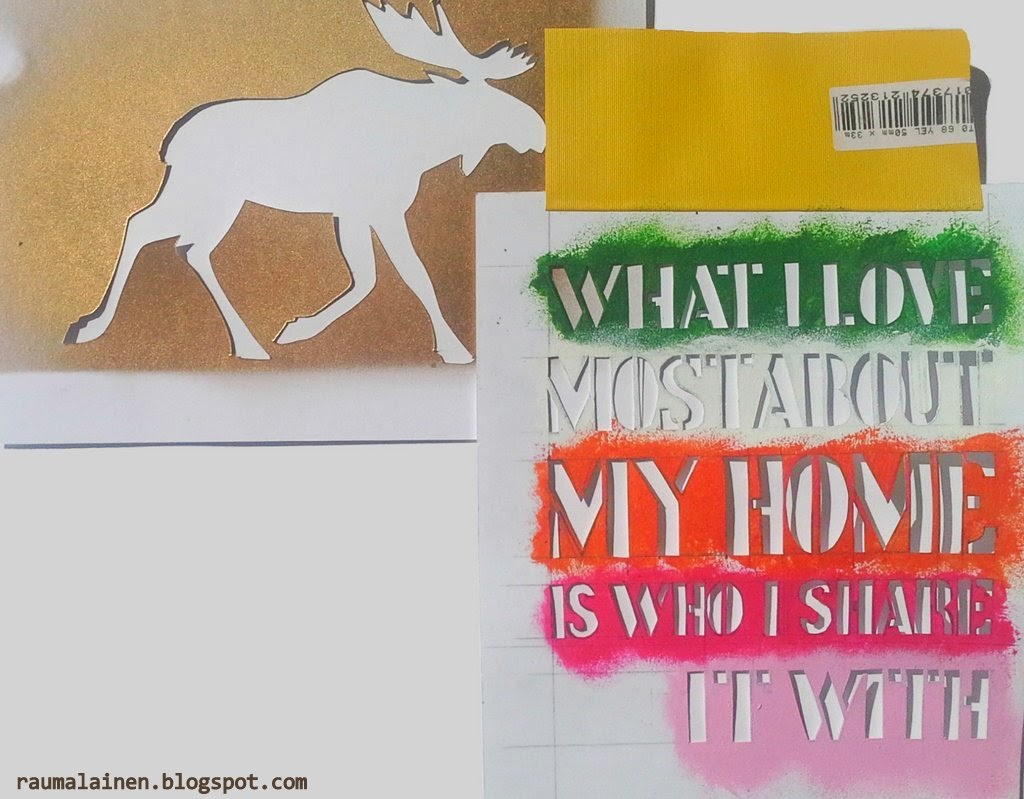
Please meet another album. We have friends who moved recently to a new house, that's why there's the "What I love most about MY HOME is who I share it with" on the cover. I've cut this phrase as a stencil after I've seen it very many times on Pinterest, because I was looking for a quote about home and this one killed it.
Plus we all live in Finland, and I have been preparing another project which involved a stencil of a moose based on a finnish road warning sign (found here).
Actually I didn't mean to put the moose onto, but somehow the finished cover was missing un "je ne sais quoi", something playful and random to make the whole thing look a bit upbeat and fresh. Happily I has my moose stencil cut while pausing from the album project and waiting for the paints to dry. Coincidently the stencil and the album happened to be both at the same time at the same place.
And another happy incident was that I've messed up a couple of inches on the album cover. One more flower to hide it didn't help. But a moose stencil would if only I'd find the right colour! I've bought a golden spray paint that morning coincidently, for another project, so off it went to put a golden moose to the cover.
It looks a bit blurred (which by the way doesn't hurt), maybe because of the coarse linen surface. As I was featuring the same moose on the white plain pages, it's looking much clearer, and it has that nice shimmer - that was the element I've been missing, and I'm THAT happy about all the coincidents along the way!
Monday, July 14, 2014
DIY tutorial - how to make an album
Today I'm going to show you how you can make a beautiful album with some basic supplies - cardboard, white paper, paints, bubble foil, some glue and linen fabric, and paper napkins. Let's break down in steps.
Subscribe to:
Posts (Atom)


.jpg)