Pages

Friday, March 29, 2013

Doing (almost) nothing on Easter weekend

It's slowly starting getting less cold, there're already the first spring pot flowers in grocery stores and I'm back again sketching flowers.

A little peek today in my so-called sketchbook – right now (and mostly) disparate loose paper sheets that are filled with all the ideas that come across as the day goes by – it's  a long Easter weekend here, so we're all a bit chilling at home and doing nothing, and it feels good. And I'm making some sketches for stationery, upcoming envelope cushion cases and cards for FOREST FRIENDS, as well as some floral arrangements for future linocuts in mixed technique.


Posted by Picasa

Wednesday, March 27, 2013

Finishing the album

After having spent last days with everything except of the album, that I've presented in the last post, I decided to get back to it, and so I did. I've arranged my papers to build the page sequence, added some solid coloured pages and trimmed the rest of those solid coloured papers to tags to write my little side notes to the photos. And I've left those tags without any surface treat, like handprinting, paint rolling or alike - I like their simple and calm textured surface, to contrast a bit with pages, but without getting too overworked.

And this album has different sized pages - some of them smaller than the others (actually only two sizes in this example) - so that if you have a smaller one in front of you, you can see the bords of following bigger ones - there's something I LOVE about different sized pages, and so I do.

So here they are - green and hot pink note tags, and some lined tags, to complete the pages. I've laid them out quickly to see how they work together - not bad. Now the only thing I need is waiting for photos to get printed and sent!

There`re 24 pages, hand painted/printed on both sided in the album, here I'm sharing only some of them, otherwise there would be too many photos. Blogger Lightbox is still not functionning, so each photo is still popping up in a separate tab, there're many people out there reporting the same problem, and nothing changed yet! That's why I avoid posting lots of photos.

I might make some bigger tags as well, so that my little girl can make a couple of fun drawings to put them into the album as well. And a couple of envelopes of vellum paper, just to add some interesting details.


Posted by Picasa

Sunday, March 24, 2013

Making folders

Well, I'm not having any tutorial, as I thought I would do on this project. It all was a bit too improvisational and not quite knowing what I would get at the end, not being sure about the path to follow. Long story short - I'm not feeling myself ready and having enough experience to get it all well summarized and clearly explained. I'm gonna stick to it and continue, working out new designs, trying out new techniques and getting more confident about the way I work.

For this time, it's a middle sized FOLDER aka future photo ALBUM. 

I've hand printed in last days a LOT of heavy paper and cardboard to build the inlay. It's all in the colourway I'm currently obsessed with - that from the FOREST FRIENDS' serie - subdued orange, olive greens, sparkles of aqua blue, more or less strong pink hues. I've covered it with some paint that imitate linen (or stone, depends on associations) so that all the modge-podged paper pieces hold together.

A bit of other colours, applied with a roller here and there, a bit of hand printing, and a tag. And yes, some hand printed/textured (banana) paper on the inside. I'm happy how it turned out - with multitude of textures, sunny colour sparkles, lots of layers and some interesting patterns appearing here and there.

Hereafter some hand printed pages. Now I'm gonna need some punching, tag-making and than off it goes to the photo shop to print some photos and fill this new gorgeous album.


Posted by Picasa

Friday, March 22, 2013

Happy Easter - crafting with kids

Today I'm back to crafting with kids after all the vacations, winter camping, inevitable flu etc. - making EASTER decoration and waiting for spring to come (still snowing here and no spring in sight).

I took DIN A4-sheets of middle heavy paper - about 200g/m2 - something that can well support acrylic paint without going curly. I've applied the first coat in raw sienna mixed with a drop of green paint and some  white with a roller - my by far most favorite tool to apply paint quick and easy. I've only covered the outer area of my paper, not in the center. The center was covered with another mix - a lot of white paint gradated with some different shades of greens, to create a nice sunny shade of warm light green paint. I've only made a couple of quick moves in the center.


Next step was creating STENCILS- based on a loosely made sketch of some various spring flowers. Not being that precise, only filling the surface and paying attention that the shapes vary in size and character. I've cut them with my x-acto knife, and I made several stencils, only because there are always about a dozen of kids crafting, so the waiting time with only one stencil would be beyond their patience limits.


The third step was to make a template of an egg and cut them of corrugated cardboard - two for each participant. I've also sandpapered them, but actually for the finishing it was not necessary. At that stage I thought that the boards would remain visible, so the nicely sanded boards would be important.

This was all (almost) you needed to prepare forehead.


Now we can make a SAMPLE. Start with mixing some light rose paint and take your stencil. Stencil your flower pattern with a sponge, gently tapping through the openings. You can fix your stencil with tape, so that it wouldn't move while working.

And here will the little artists start - stenciling the paint on the prepared cards.


Now I've covered the cardboard egg shapes with MARIMEKKO paper napkins - this design was just perfect - stripes in different colours, patterns, and you can easily cover nearly any simple shape thanks to its light weight texture.

They can be pre-cut before the workshop, or let children do it.


Fold down the napkin surpluses on the back side and glue them.
Now you have a couple of nicely striped decorative eggs.

Covering the cardboard eggs with napkins was also made by little artists.


All you have to do now is cut two short stripes of paper (in my case orange banana paper) and glue them on the right side so that the little artist can put his note there - like HAPPY EASTER or alike. Glue the eggs and now you're done! Now the little ones have made their very special Easter card. Congrats!


I've added a couple of leftovers from stencil cutting on the top, but maybe that was not that necessary. Anyway now I have to figure out what to do with all those cute flower shapes that are left. Maybe the subject of the next tutorial. Stay tuned!

Thursday, March 21, 2013

About sad books, thrifting and re-purposing

I could sometimes say that, yes, thrifter could be my middle name. 

There're lot of things out there that get me excited, inspired and hooked, and thrifting is by far one of the strongest among them. I'm occasional, but passionate thrifter, going with the flow while plunging in flea markets with no particular idea.

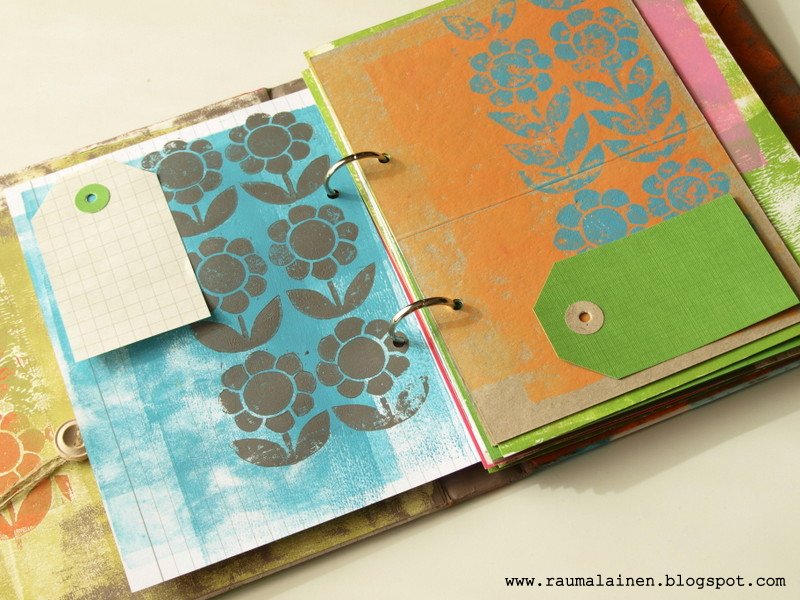
This time though I did have an idea – for my stationery. I guess any stationery creating hits sooner or later the question of book making – no matter which – albums, mini books, notebooks, you name it. And here we are, starting once again with me being unable to find albums for a couple of projects – photo albums, planners, or some books to fill with notes and all the random stuff. There're like entire shelves in stores filled with albums of any sort, and size, and price, and me spending time and not finding the perfect one. 

So I went thrifting – and grabbed some old books in different sizes, that no person needs, but with covers exactly how I wanted them to be in texture and colour, or sad, abandoned children books with faded illustrations (though there're books that „get old“ beautifully and look great despite the aging, I'm not speaking of those books here, those ones were made to stay as they are and have to be treasured). 

Well, the sad books.... They may have nice coloured cover, with all the aging marks that are just perfect for my purpose, or they have heavy semi-gloss paper or even cardboard pages, that would be repainted without any curling and would support many of techniques to embellish the pages. 

Now I'm coming to the target: all those qualities, paired with the price, make them perfect objects to be re-purposed – to frame an album, that I would make of loose pages and customize to my liking or to build a skeleton of a mini book or a note book. Stay tuned – I'm gonna figure it out in coming days and make a tutorial post on this subject.

P.S. Currently there seems to be a bug in showing the photos in a lightbox, and I thought there was something wrong with my settings. So I checked many times. It didn't work. Currently the photos appear separately each time in a new tab, so showing them in a row/scrolling is now impossible. And it's quite uncomfortable, because each photo pops up separately, so there's no photo flow as usual. I've observed the same bug on other blogs, so it's more like a blogspot general bug right now, and not only my personal one. Hopefully it'll all soon gets back into its normal setting and the photos will appear in a lightbox. Hopefully..


Wednesday, March 20, 2013

NEW - Coasters

This idea was born because I have a bad habit, or rather not have a good one - about protecting the table surface with coasters while putting glasses/cups on it. I simply do not think about it, though many of my family, relatives and friends are using them. And as far as my tables have always been arranged coaster-less-ly (trying to be somewhat economical with words), I haven't thought about creating them - all of my products start because they represent something that I need and want to make it to my liking/put my own twist on it.

So as a non-coaster-user I didn't think of coasters. Until today. Of course I have them around the house, as gifts from friends, or cardboard ones collected during travels and actually meant to complete the photo albums. But never used them purposefully.

I've made a couple of sketches for cross-stitching this morning, made a pause and changed my mind -  I've turned them into coasters, simplifying the designs and getting back to fabrics. Recently I've spent lot of time working on kids' stuff and paper projects/stationery, so I was so glad getting back to sewing machine and making something for grown-ups. In the colourway of FOREST FRIENDS though. Working with usual suspects - appliqué, free motion machine embroidery, thick padding, backside heavy linen. And using all the small and tiny scraps left from bigger FOREST FRIENDS' projects.

Quite quite happy how they turned out, and from now on  I'm gonna create a couple more of those little helpers.

It was challenging working so small-sized ( appr. 11 x 11 cm / 4" x 4"), and if I hadn't spent countless hours recently figuring out my way of creating the cross stitch patterns, hence working rather small, I wouldn't come up now with coasters.... I'm taken by surprise over and over again about the ways the one things induce the others, so that nothing is without purpose, even the most weird and seemingly conterproductive ideas as recently my slip into cross-stitching...


Posted by Picasa