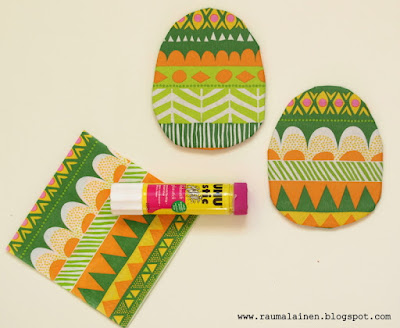
Today I'm back to crafting with kids after all the vacations, winter camping, inevitable flu etc. - making EASTER decoration and waiting for spring to come (still snowing here and no spring in sight).
I took DIN A4-sheets of middle heavy paper - about 200g/m2 - something that can well support acrylic paint without going curly. I've applied the first coat in raw sienna mixed with a drop of green paint and some white with a roller - my by far most favorite tool to apply paint quick and easy. I've only covered the outer area of my paper, not in the center. The center was covered with another mix - a lot of white paint gradated with some different shades of greens, to create a nice sunny shade of warm light green paint. I've only made a couple of quick moves in the center.
Next step was creating STENCILS- based on a loosely made sketch of some various spring flowers. Not being that precise, only filling the surface and paying attention that the shapes vary in size and character. I've cut them with my x-acto knife, and I made several stencils, only because there are always about a dozen of kids crafting, so the waiting time with only one stencil would be beyond their patience limits.
The third step was to make a template of an egg and cut them of corrugated cardboard - two for each participant. I've also sandpapered them, but actually for the finishing it was not necessary. At that stage I thought that the boards would remain visible, so the nicely sanded boards would be important.
This was all (almost) you needed to prepare forehead.
Now we can make a SAMPLE. Start with mixing some light rose paint and take your stencil. Stencil your flower pattern with a sponge, gently tapping through the openings. You can fix your stencil with tape, so that it wouldn't move while working.
And here will the little artists start - stenciling the paint on the prepared cards.
Now I've covered the cardboard egg shapes with MARIMEKKO paper napkins - this design was just perfect - stripes in different colours, patterns, and you can easily cover nearly any simple shape thanks to its light weight texture.
They can be pre-cut before the workshop, or let children do it.
Fold down the napkin surpluses on the back side and glue them.
Now you have a couple of nicely striped decorative eggs.
Covering the cardboard eggs with napkins was also made by little artists.
All you have to do now is cut two short stripes of paper (in my case orange banana paper) and glue them on the right side so that the little artist can put his note there - like HAPPY EASTER or alike. Glue the eggs and now you're done! Now the little ones have made their very special Easter card. Congrats!


No comments:
Post a Comment